Saturday, September 28, 2013

DIY: Lace Trim Shorts

Once upon a time, a young lady had a stellar pair of Level 99 wide leg denim trousers that just weren't worn anymore.


With this brilliant idea to turn them into shorts, and no sewing machine at the time, she took them to an alterations place and explained the desired outcome to the expert...

OK, so she is me, and this cost me a pretty penny to have done. I figured a good pair of jeans would equal a good pair of shorts, and with lower cost than new shorts, so money well spent, right?

They looked so cute! Just as I had imagined with a pretty little turned up 1" cuff. Then, I tried them on.


Problem:

Maybe this wasn't her job, but the tailor could have told me that in creating the cuff that I wanted, the leg openings would tighten a bit. My legs looked like SAUSAGES inside these things! Not cute. Bad. Very bad. (I wouldn't share a picture of this even if I had one.)

Ripping out the beautiful, freshly sewn cuffs, I thought, oh well they'll just be cut-offs. Fine. Only not. Again, having zero knowledge of technique, I didn't know (but soon found) that underneath the cuff lied a mutilated cut. Notches sort of cut out of the sides.

I'd have to cut them even shorter to even them out. Take my word for it. No longer wearable for me. Daisy Duke and I have much different figures. And jobs. And lives.


Solution:

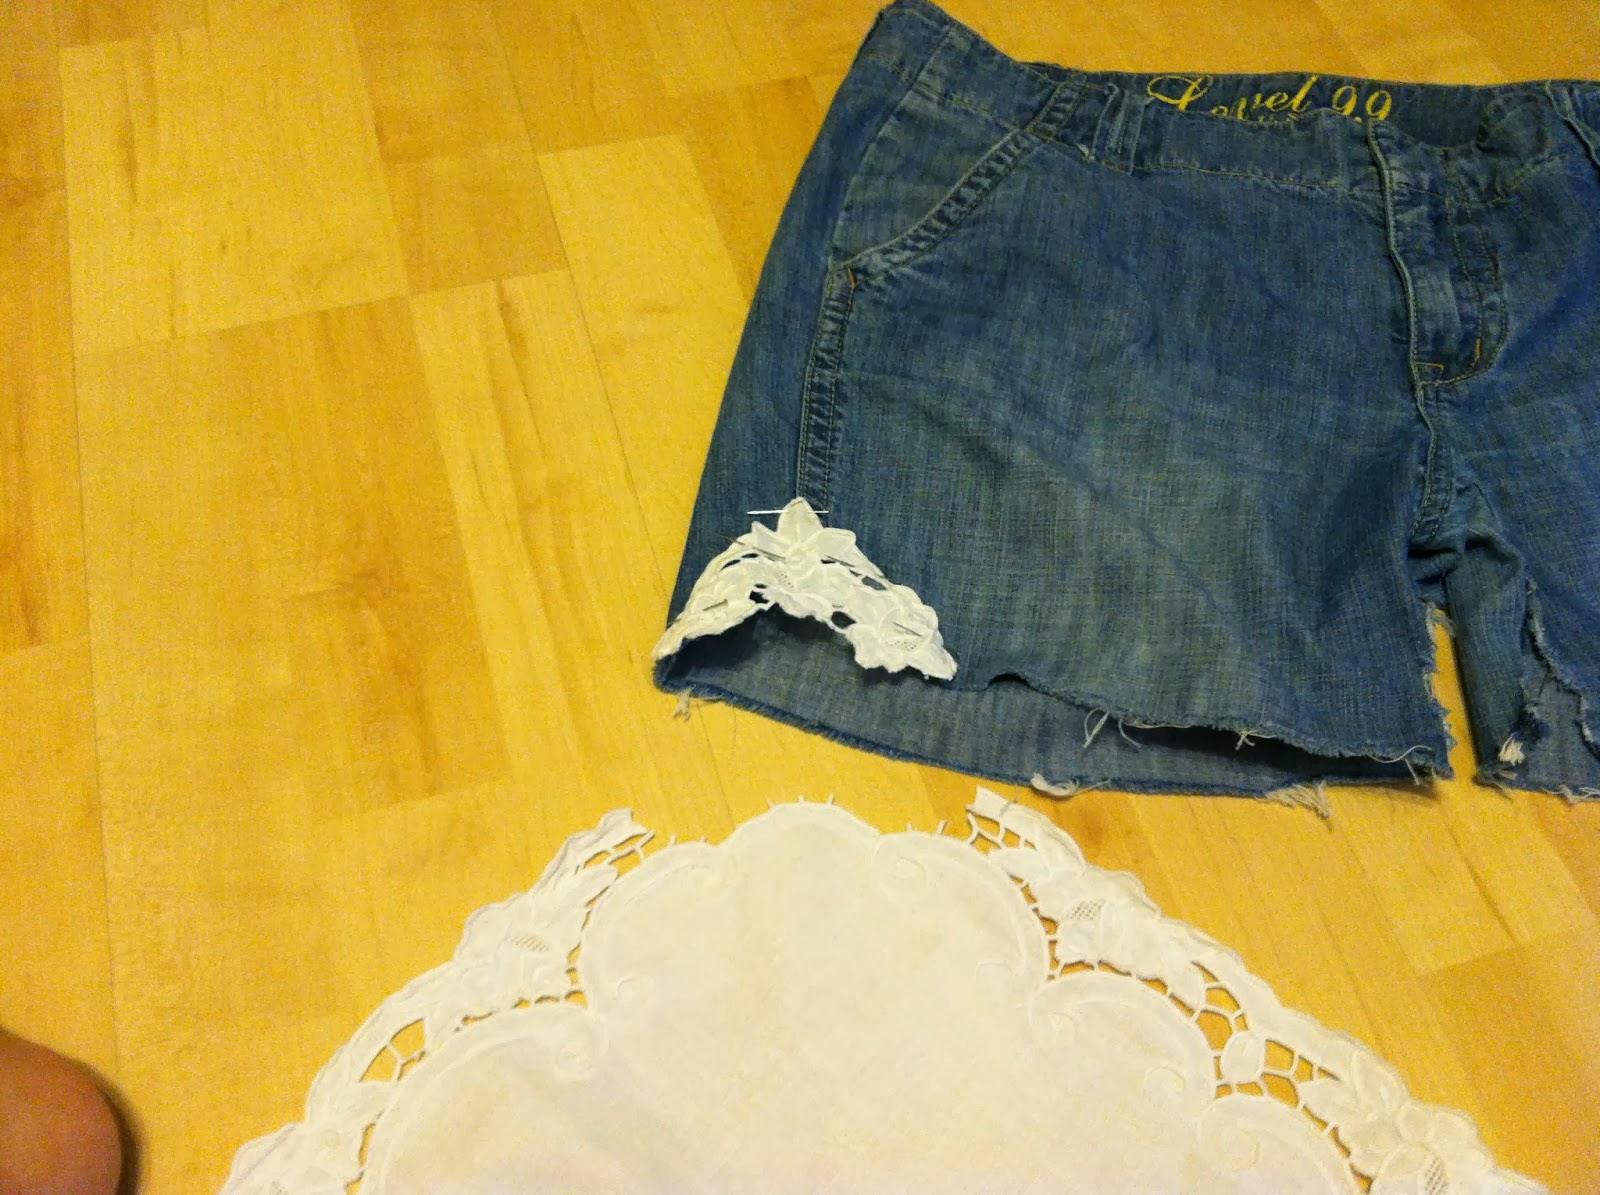
After many moons at the bottom of a drawer, I spied some precious lace trimmed shorts online, and was instantly inspired. Finding the right "lace" on an antique runner at one of my favorite Austin thrift shops was the missing piece to my puzzle, even though it isn't even true lace.


I started by clipping the corners off the runner and pinning them to the out & insides of the shorts, utilizing the triangle shape to give a smidgen of extra room in the legs. (Doing my part to rid the world of unsightly sausage leg.)

I spent a lot of time pinning, re-pinning, eye-balling, trying on, staring in the mirror, and getting stuck with pins to get the placement just right. What can I say, I'm a trial and error kind of gal.


Next, I clipped the straight edges, following the detail of the pattern. Upon careful surmising, I pinned these down along the legs, front and back sides. This part was much simpler than the corner pieces.


Once the placement was perfect and pinned in place, I machine sewed along the edge of the whole thing, and tacked the tops of the flowers down by hand so they would lay flat.


Last, I tacked in a little peek-a-boo piece to the left front pocket. Just for fun.


Whether your have jeans with a story, or you just want to DIY your own lace trimmed short- I say go for it!


P.S. If you live in Austin, no, shorts weather has not passed. :)


Monday, September 23, 2013

Dyeable: Grey is the New White

I think I'm a bit hard on clothing. I mean, I don't just wear clothes, I tend to wear them out. I get holes, spots, runs, stretched out, misshapen, stain riddled- you name it. As lately in life, shopping for new isn't always in the budget, I have a tough time tossing clothes out, especially pieces I love, even once they are in a worn out way.

Here is such an example. A lovely, white, gauzy blouse that had sadly come to be... well, embarrassingly less than white. Hang in there, gauzy, maybe I can save you!


I had never given dying much consideration before this attempt. I'm a renter and have yet to own a washing machine to fill with colorful dye baths as I so desire, and truthfully (other than tie-dying summer camp style) I never considered there might be another way. Thanks to all the bloggers and pinners that have come before me,  I have learned otherwise. Upon the purchase of a large, $2 pot from a thrift store, and a bottle of liquid dye, my stovetop and I were in business.


I chose to go grey because I love pretty much anything grey, but honestly, I also thought it was a safe bet for a first time dyer. Plus, this blouse has silver stitching details, and I wasn't sure what was going to happen to that in the process, but voila!


I couldn't be happier with the result! It hides its ugly stains perfectly and looks fresh and new again. And I love that the stitching resisted the dye- total happy accident! I wear it all the time- yep that's it in my "about" pic.


Here are some dying pointers I plan to keep in mind for future dye projects:
  • Directions are on the package, read them. Again. They usually know what they're talking about- and different brands do seem to handle differently.
  • Cottons and most natural fibers should accept the dye well, other fabrics and blends are a gamble/ may require a particular type of dye. Always consider the details too!
  • A dye bath needs plenty of room for the garment to swim around freely. My 8 quart pot fits 1 top well and uses approximately half a bottle of dye. (I tried to do 3 items in one pot once since- MISTAKE! They all came out blotchy.)
  • Salt can be added to deepen the color. (Approximately 1 Cup)
  • Gentle laundry detergent can help evenly distribute color. (Approximately 1 Tbsp)
  • Launder separately for the first few post-dye washes to make sure no bleeding occurs.
The advice I would offer to anyone experimenting with dying is just that; consider it an experiment! Start with a piece that won't be a sad loss if the result is less than perfection. It'll be such a pleasant surprise if it is!

Tuesday, September 17, 2013

Rainbow Brite Remake

Some have dubbed it Rainbow Brite, some christened it the Gay Pride dress; whatever you wanna call it- I love this vintage number. I'm guessing early 70s? Anyway, it just makes me happy! I picked it up in Eugene, OR on a road trip with my sister in 2005. I wore it plenty in its original form, especially when I worked retail in NYC. (Loved it with boots and a sweater!) However, what ever kind of poly blend it's made out of does not breath and is HOT. Factor in the less than opaque white base (which calls for an under layer) with sweltering Austin temperatures, and you have a recipe for sweat city. So, sadly it went unworn for quite a few years, until: I decided it was time to give it an easy breezy make over.


I saved the part of the skirt that got the axe and wear it as a sash, but have hard belted it too for a different look.


The fabric was pretty tough to work with, and took my novice self several rounds of undo and redo. Frustratingly slippery! I couldn't quite to get the sleeves right so I cinched and wrapped with ribbon pieces as a cover up/solution. It's far from perfect if inspected up close, but to me it's wearable! The heat is now tolerable, and I actually think it's much more fitting of its playful and flirty rainbow stripes this way.


Saturday, September 7, 2013

Let's start at the very beginning


I pulled my mother-in-law's Singer Fashion Mate 257 (circa 1972) out of storage, dusted it off, and took it to the doctor. When I went to pick it up, the gentleman at the Singer repair shop (who probably owned the joint, and had since before this model was made), asked me if I would rather just purchase a new machine instead. That did not seem to bode well- I was worried.

However, this little green machine has some life in her yet! Don't misunderstand, she definitely has quirks and limitations, and is certainly not as user friendly as a fancy new machine, but I like her. And I'm determined to employ her as long as she'll have me.

My own mother (who taught me the basics of sewing when I was a kidd), passed me a dress that wasn't working for her. Simple, black, thick knit jersey- which would never have made my rotation in it's original form. So, channeling inspiration from a blog I'd recently stalked (NDAD), along with good old trial and error, I chopped and hemmed, and chopped and hemmed some more- and was super excited with the result! And encouraged enough to sew another day...